Helpful Guides
How to Turn a 2D Image into a 3D Model (Free)
Turning a 2D image into a 3D model can seem daunting; however, with the right tools, the process can be straightforward and even enjoyable.
Discover the intricacies and benefits of 3D scanning in design and engineering, detailing its optimal use cases and limitations.
3D scanning provides digital replication of physical objects with remarkable accuracy. Despite its precision, it is often more expensive and time-intensive than conventional engineering methods. The process includes several stages, such as the preparation of parts (such as coating reflective or transparent surfaces), the actual scanning to produce a mesh, and the subsequent transformation of this mesh into a solid file for manufacturing or design refinement. However, 3D scanning is not without its limitations, facing challenges in scanning damaged parts or accurately capturing deep cavities. It shines when applied to small, intricate components where precision is crucial. This article provides an extensive overview of the 3D scanning process, its varied applications, and its limitations within the sphere of design and engineering.
3D scanning has become a cornerstone in the fields of design and engineering, offering unmatched precision in the digital capture of physical object properties. This thorough examination breaks down the 3D scanning process into its fundamental steps, each essential for securing a high-quality digital replica of the physical part. Grasping each stage, from the initial preparation to the final file generation, is vital for professionals in sectors such as automotive design, aerospace engineering, and manufacturing.
The initial step of surface treatment in the 3D scanning process is crucial, particularly for parts that are reflective or transparent. These materials can skew the scanning beam, leading to inaccuracies in the final output. To mitigate this, such parts are typically coated with a non-reflective, opaque substance. This coating ensures the scanner's light or laser accurately captures the part's geometry without the interference of reflections or transparency.
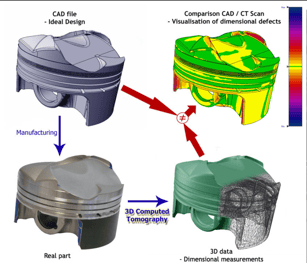
Standard scanning methods may fall short when dealing with smaller components and parts with complex internal structures. More sophisticated techniques like Computed Tomography (CT) scanning come into play in these instances. CT scanning enables the detailed and precise capture of both external and internal geometries, ideal for intricate parts where every detail is crucial. This method finds significant application in industries such as medical device manufacturing and precision engineering, where the internal structure of a part is critical to its functionality.
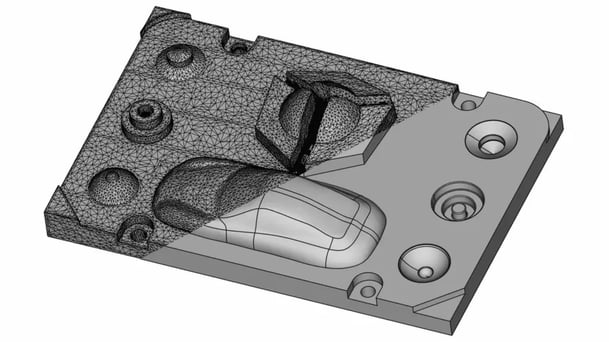
Following preparation, the part undergoes the actual scanning process. The scanner captures the part's geometry using laser or structured light, resulting in a point cloud. This point cloud is then transformed into a mesh – a digital model comprising interconnected vertices, edges, and faces. This mesh accurately represents the original part, capturing its shape and dimensions. However, it's crucial to note that this mesh is often unsuitable for manufacturing or design modifications and necessitates further processing.
Post-scanning, the mesh file, useful for 3D printing, typically requires conversion into a solid model for other manufacturing processes. This step involves reverse engineering, where the mesh serves as a reference for creating a CAD (Computer-Aided Design) model. This CAD model is far more adaptable and suitable for various manufacturing processes. At this juncture, additional details like threading, fitting tolerances, and other vital features are incorporated into the model, rendering it ready for practical manufacturing use or further design improvements.
Opting for 3D scanning depends on several factors. It is particularly beneficial for parts with complex geometries where high precision and detail are essential. Typical examples include intricate aerospace, automotive, or medical device components. However, 3D scanning may not be the ideal choice in some situations. Damaged parts might not yield accurate scans, and deep cavities pose a challenge, as scanning technology can only penetrate a certain percentage of a hole's diameter. Thus, thoroughly evaluating the part's condition and structure is imperative before proceeding with 3D scanning.
To achieve optimal results, understanding when and how to effectively utilize 3D scanning in the design and manufacturing process is crucial. This involves selecting the appropriate parts for scanning, ensuring the right scanning technique is used, and applying proper post-processing methods. For instance, CT scanning is preferable for small, complex parts, whereas laser scanning might be more suitable for larger components. Additionally, the choice of CAD software for processing the scanned data significantly influences the ease and precision of the final design.
Turning a 2D image into a 3D model can seem daunting; however, with the right tools, the process can be straightforward and even enjoyable.
Delve into the various types of 3D scanners and scanning technologies, including a detailed look at industrial/CT scanning.
Discover how 3D scanning services are transforming the aerospace industry by enhancing precision in manufacturing, design, and maintenance.